Showing posts with label upcycled projects. Show all posts

Wednesday, January 1, 2014

365 MAKE IT challenge

I decided to give myself a challenge this year and of course I had to make it a creative challenge. But because I didn't want to make it ONLY a crafty challenge 

Good evening-I wanted to do something that would make an impact this year - you know set the mood for a wonderful 2014...so I thought I would give myself a challenge:

I decided to call it the 365 MAKE it challenge.
 
So for the next year I will be "Making" something which can include crafting, sewing, painting or cooking. It's just gotta be MADE by me!

I think this is going to be a good thing,  mostly because life gets so crazy that it'll be a positive thing to force myself to do something creative everyday! It'll be a small moment that will be devoted to me to exercise my talents! 

If you plan on joining me please leave a comment and I will definitely come check it out. I am hoping to figure out the linky tool and add it here - we'll see.

My first project for January 1, 2014 is a repurposing project which I started today and will get done tomorrow. Here are photos of the piece:


It's a headboard/footboard made into a bench - which I've had for awhile...I painted it white (I'll share the painted piece tomorrow)


ok - so that I have a completed project to share  I did make the card above tonight too for some friends that helped us with fan installation today! Cool friends are essential to a happy life! 

Let the CHALLENGE begin! Happy new year to you! Please come back and check out my daily posts! 

Happy crafting!
Tina 

Friday, October 25, 2013

CHALKingly good

Don't know if you have fallen in love with the art of CHALK or chalk art in the manner of signs...well I sure have and while I have not mastered it - I have definitely played with a bit. I have been trying to make some fun signs for my show this Saturday using the CHALK ART writing...so I did 2 signs...

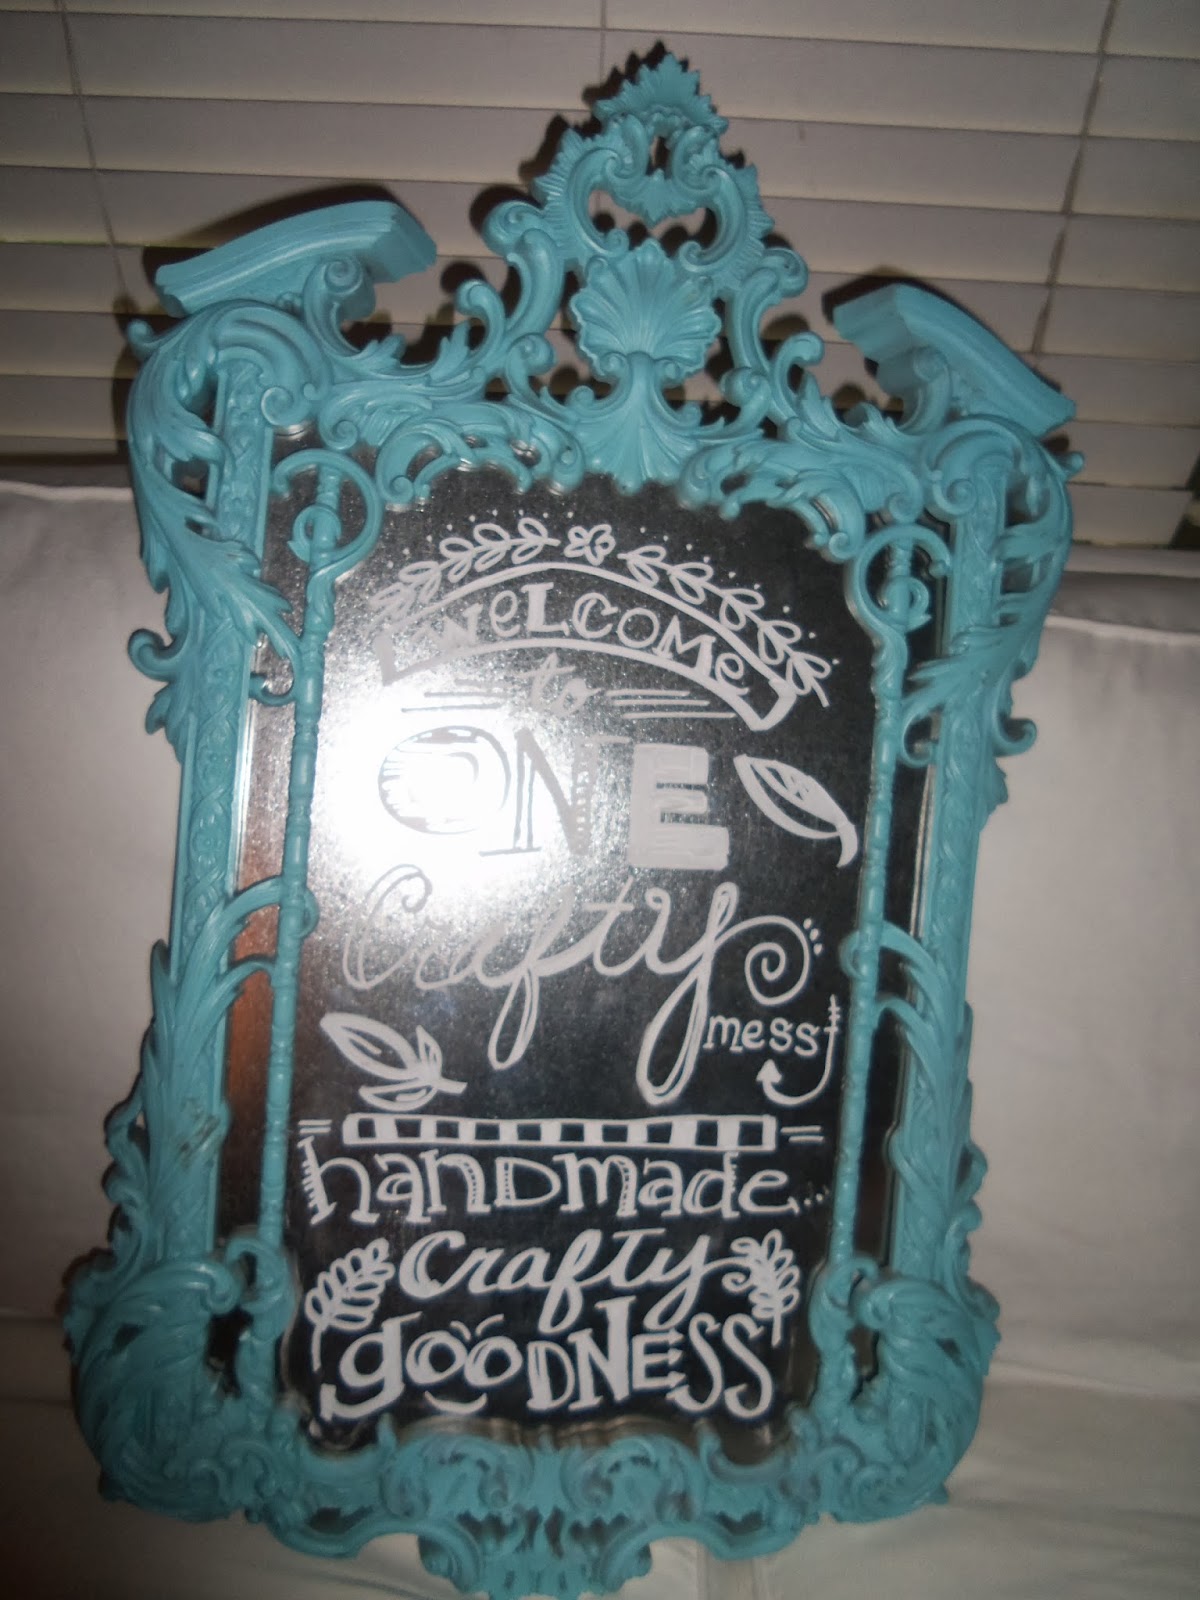
The first sign I made using an old mirror frame which is amazingly ornate and which I painted Robins egg blue...

 
then I looked on pinterest for some ideas using the chalk writing and of course there is a bunch to choose from.

 
I bought one of those bistro markers - that are chalk in a pen (easier to write with)
 
and took bits and parts from various signs I saw and added them to my sign 


Here is the whole sign - wanted you to get an idea of the whole thing even with that snarky glare

 
here is a close up of the writing. I am not a pro by any means and quite frankly its not as clean and wonderful as those on line but I can say that I am quite pleased with the way it turned out.

 
The Bistro chalk marker I used was a chiseled tip and quite thick and made for writing in small spaces a bit hard

 
Like I said I took different parts from various images I found...

 
some made sense and some just filled spaces. But I LIKE it A lot.
 
The 2nd chalk sign I made came from using a vintage doll crib.
 
This is one side and the other side was blank (no tiger)
so I painted it with chalkboard paint and added a cute FALL banner

 
and this time using an actual stick of chalk made this sign for my booth tomorrow.


I love it and well consider it my contribution to upcycling. Viva our environment.
 
Ok. so I hope these make a splash tomorrow at my show. Wish me luck.
 
Linking up to the parties in my link above.
Have a great weekend folks.
 
xo

Sunday, August 11, 2013

Feeling Blue

Funny title to my post because in no way do I feel BLUE...I am feeling quite splendid today. My title refers to a make-over I just finished. I found this cool vintage side table (I think that is what it is) its very 50'ish looking, but I wasn't feeling the brown wood look. So began my newest furniture make-over.

Here's the table before I got my hands on it....


Not a bad looking piece right? So I sanded and sanded some more
 
 
had to get the handles off and try and remove the indentions from the handles...wanted a fresh base

 
then I thought I would paint it cream and add some color to it - so I grabbed my handy spray paint and got started

 
worked on the top and then was scheming about what other color or design I would add to the piece to make it look cool and fresh...

 
Don't laugh. I really liked the coral and aqua look and thought I would throw in the gold but shoot if it didn't come out funky...I was bummed so I re-sanded....and then decided to a MOSTLY one color - color scheme.
 
 
Hence the FEELING BLUE - see doesn't this look MAGICAL??? I am so in LOVE.

 
I added gold paint to the handles and the front feet (which you cant see) of the dresser/table and my sweet husband made the vase for me because I needed a prop - again with the gold spray paint.
 
Up close shot of the vase....and in case you are just smitten with the pear - I made it ---it's made of clay. Pretty? I dig it. So here on this blog you'll see the GOOD & the BAD and even the UGLY :)
 
 
I am linking this up to the following parties this week (please see the links in my tab above)
 
 MARKET YOURSELF MONDAY
CRAFT-O-MANIAC
MONDAY FUNDAY
GIVE ME THE GOODS MONDAYS
 
NIFTY THRIFTY SUNDAY
THINK PINK SUNDAYS
 
TAKE A LOOK TUESDAYS
SHOW ME WHAT YOU GOT TUESDAYS
 
HAPPY CRAFTING
XO
TINA


Tuesday, April 30, 2013

Bedroom Stool Makeover

 Still nesting --- had this bedroom stool that was originally brown with a red tapestry cover so I thought I would paint it white and added a soft blue velvet cover and thought I would keep it in my room

 
But I lived with it for awhile and well it was o.k. but not PERFECT

 
Then I had a "LIGHTBULB" moment and thought BLACK was the color...of course

 
FRENCH boudoir - good idea right?

 
I picked the WRONG burlap - I grabbed wine labeled burlap on accident - but I gotta say

 
I love it! Looks so much more chic and yet still has a French feel to it!
 
What have you been up to?
 
I am linking this up to the following parties:
 
 
xo


Tuesday, April 23, 2013

Barstool do-overs

I think it is the Spring Season - the fresh air - the new growth - the brisk sunshine days that is causing me to sort of nest (minus the pregnancy). I have been re-doing just about everything around my house.

Take for instance these crummy old stools - picture them with brown legs and those black seats...then forward three years to last October 2012 and I decided to paint the stool legs yellow...and not to well at that...

 
made some damask seat covers - this was my first time trying to use elastic plus trying to get the exact measurements to go completely around the seat and as you can tell - it didn't quite make it.

 
The first stool was NOT easy - so on the next stool I decided to staple the fabric down around the bottom of the stool  - yeah didn't like that look either. So instead of getting NEW stools I decided to give it one more chance and  decided to paint the stool legs RED...I know silly but I LOVE red...


This time I decided red was the color I wanted to use = so I bought some spray paint and painted the stool legs a candy apple red gloss and I love them. Since I didn't want to try again with that elastic I decided to use some fun oil cloth - which serves 2 purposes: first of all its too cute second it WIPES clean no more stains that don't come off or crayon marks - LOVE oil cloth...now I wont take an up close shot because while this is cool stuff it doesn't exactly gather well like fabric so lets just at how pretty they look from afar...
 
 
I am really loving these...
 
I am linking this project up at the following parties:


happy crafting
xo
tina


Tuesday, April 9, 2013

the Goodwill HUTCH

I don't think there is a single person out there, rich or poor, that doesn't love a good thrift store. Personally I prefer the smaller - guy next door type of thrift store,the prices are a bit more reasonable. But on a recent trip to the GOODWILL I found a diamond in the rough....

An OLD 1970's hutch...here is the top of the hutch


this is the bottom


Here are the cupboards - liken the detail.
this is after a sanding

 
Here are the drawers - love the key hole

 
Here is the hutch after I painted the hutch a light grey. There is no color name because I created it - I made some CHALK PAINT using 2 parts paint to 1 part plaster of Paris, just mix and add until you get a thick pancake type mix...then I added black acrylic paint until I got the color I needed. You wouldn't think it but I used quite a bit of black paint to get it to this color.


I painted the inside back of the hutch top with a cream colored paint and the edges of the inside of the hutch I painted a light robins egg blue.

 
I accented the cupboard doors and the top cabinet doors with the same blue

 
and here is the grand reveal....
 
 
We found the knobs at Hobby Lobby and I just SPRAY painted them with a matching cream paint

 
I am thinking I may need to touch up the screws

 
Up above is an up close shot of the knobs...love it with the blue & grey

{oh and a little rascal who loves to invade ALL my photos}
 
 
I know you may be thinking that yellow walls & red accents is all too much color for a kitchen but I guess its a reflection of my life, scattered, filled with kids and chaotic...kind of like my decorating ideas in that there kitchen.
 
I LOVE it!!!


I wanted to have a substantial piece in the kitchen and I wanted it to work less like a showcase piece and more of a functional storage unit. I put my glass ware in here and some serving pieces in here that are easily accessible. Again lots of color....
 
but compared to my last piece I think this is a really awesome improvement...
 
Here is my last hutch ---vintage lovely but not real practical...the glass doors stuck a lot and the whole thing was a bit wobbily and the drawers served as a clutter catch all and this hutch served merely as a collection case...nothing was ever used in it...
 
 
I painted it black too - not very happy
but the detail was amazing on it...

 
see vintage Pyrex and little collections never handled or used...just a showcase unit
and OH so thin - hence the wobbily-ness....

 
in case you are wondering I sold this piece for 130.00 and bought my new one for
 
 
 59.99 at GOODWILL...
not a bad trade off right???
so keep that in mind when you are out at thrift stores...things may look bad but its nothing a bit of paint cant fix....
 
I am linking this up to the following parties:


Sunday, March 24, 2013

CRAFT BOOTH SET UP

Good Sunday evening to you. I make and sell "schtuff" at Holiday boutiques. One of the biggest issues I have with myself is my booth set up. I usually have tables and filled with more schtuff then I know what to do with...and my stuff usually lays flat..
 
BORING... I have had some help from friends and they have advised to raise things to eye level or stack stuff so that things sit up...tried it all and over the years things have evolved but still not where I think it could be....So after searching over Pinterest and seeing some cool ideas and working with what I have...Here is my newest idea
 
I had a set of SHUDDERS that I paid 25.00 years ago. My hubby took out 2 slats on each set of shudders...and added 2 8ft pieces of wood boards


I had found this cool book shelf for 5.00 at a yard sale. I painted it with milk paint and placed it under the wooden shelves of the shudders. I think I like it ---


Its big and spreads out around 6 feet wide and the slats work as a place to hang stuff from too.


and it still has room for some stand up items between the book shelf and the shudders. Neat right?
 
Here is the final set up - that I used at my last show.


Plenty of space for lots of stuff - don't you think?
 
sweet dreams
tina
 
I am linking this up to the following parties: