Showing posts with label DIY. Show all posts

Thursday, March 21, 2019

Spring stand-up sign---tutorial

Hi there

I have been scrapbooking for 20+ yeas and if you recall the options for paper and stickers were pretty sad back then. When I found something I loved I bought a bunch of sheets and used it for everything. I would hand cut flowers and sometimes letters out of my special papers (this was before sizzix and cricut)

Todays project reminds me of some good Old school paper crafting


These paper flowers and brads came in a kit from Doodlebug Designs, aren't their paper kits the most amazing colors and graphics out there.


Here are the big BASIC flowers that were included in the kit.


I cut a 6 x 6 piece of chipboard and another piece for the stand up piece for the back (see old school papercrafting) and added the 1 sheet of paper that came in the flower kit


Then I stacked the piece of the flowers and added some pop dots for some additional dimension to the flowers (see below)


This was my first attempt at making a tag for the front of the spring sign

Terrible I know


Here's the finished tag on the front of the sign. 
100% better-don't you agree?


Here is the finished sign - isn't it the cutest thing ever. 
See my last post for the tutorial on how to make those No-Sew Spring Gnomes

Here' wishing Spring weather comes around sooner then later.

Happy Crafting Friends

Tina


Friday, November 2, 2018

Halloween fun

Hey ya’ll hope your Halloween was fun 

I wanted to share photos of my kids using their treat bags we made the day before our trip to Disney 


You can’t tell but the girls have theirs on their shoulder. They all used them this night and again on Halloween night they - came in very useful and now we’ll have them forever. 

Sometimes it’s more personal and cheaper to take something simple and ordinary and make it your own with a little paint and elbow grease. 

Have a great weekend friends 

Tuesday, October 2, 2018

Hey Welcome back

Well Hello

Thanks for being here even though I haven’t been. You know that thing called life - well it seems to always get in the way - 

Anyway today I wanted to share a fun new tutorial - at least new from me 

I’m calling this a mini accordion style album 

I made a step by step photo tutorial - with all the details attached! 


For this album I used the Metropolitan Girl paper kit by Carte Bella 

If you happen to make one tag me and let me see how yours came out if you need help send me a message 

Happy Scrapbooking friends. 

xo 
Tina

Tuesday, August 14, 2018

Scrapbooking 101 - easy to make

Most of you out there are seasoned scrapbookers but for those of you who may be intimidated by an entire 12 x 12 layout I’m here to help. 

I started Scrapbooking over 25 years ago in the usual  12 x 12 layout since then I have started making smaller scrapbooks that I have shared here and ask doing project life...but there are still certain occasions I love to throw down on a piece of paper and document. 

Ok so to start grab the photos you want to scrapbook - you can add however many photos you want but I like to keep simple and generally if they are large 4 x 6 photos I like to use an odd number like maybe 3 

I have been using my Prynt photo printer or Instagram camera photos for my layouts lately so I chose to use 2 photos for this layout 

I found this amazing pad of big die cuts by DCWV so that helped with my idea planning. Then I had to choose my paper 


These were the die cuts I chose to go with my 2 photos 


Now for choosing my paper 


Still not working - if I used the paper below the die cuts would blend in to much 


I think I found the paper I’m going to use. 


Now play around with your pieces and find a layout you like or looks good to you - don’t worry about will it make it into a magazine - this is for you - something for your kids and their kids to look back on. Stress free 


I really wanted to use that small block with the gold palm trees but I could t got it into the layout so it looked good to me so I pulled it out and didnt use it 


And here is the finished layout! I love it  


Have fun with it and enjoy it - try not to put to much pressure on yourself - make memories not headaches ( wink) 

Have fun crafting ya’ll! 

T

Friday, August 3, 2018

UNICORN ORNAMENT TUTORIAL

Welcome - today I wanted to share an easy tutorial for making the cutest unicorn ornaments out there... 


Cute, right? 

This is a step by step photo tutorial with all the details and supplies needed - let’s get started 


Paint paper mache ball any color you like 


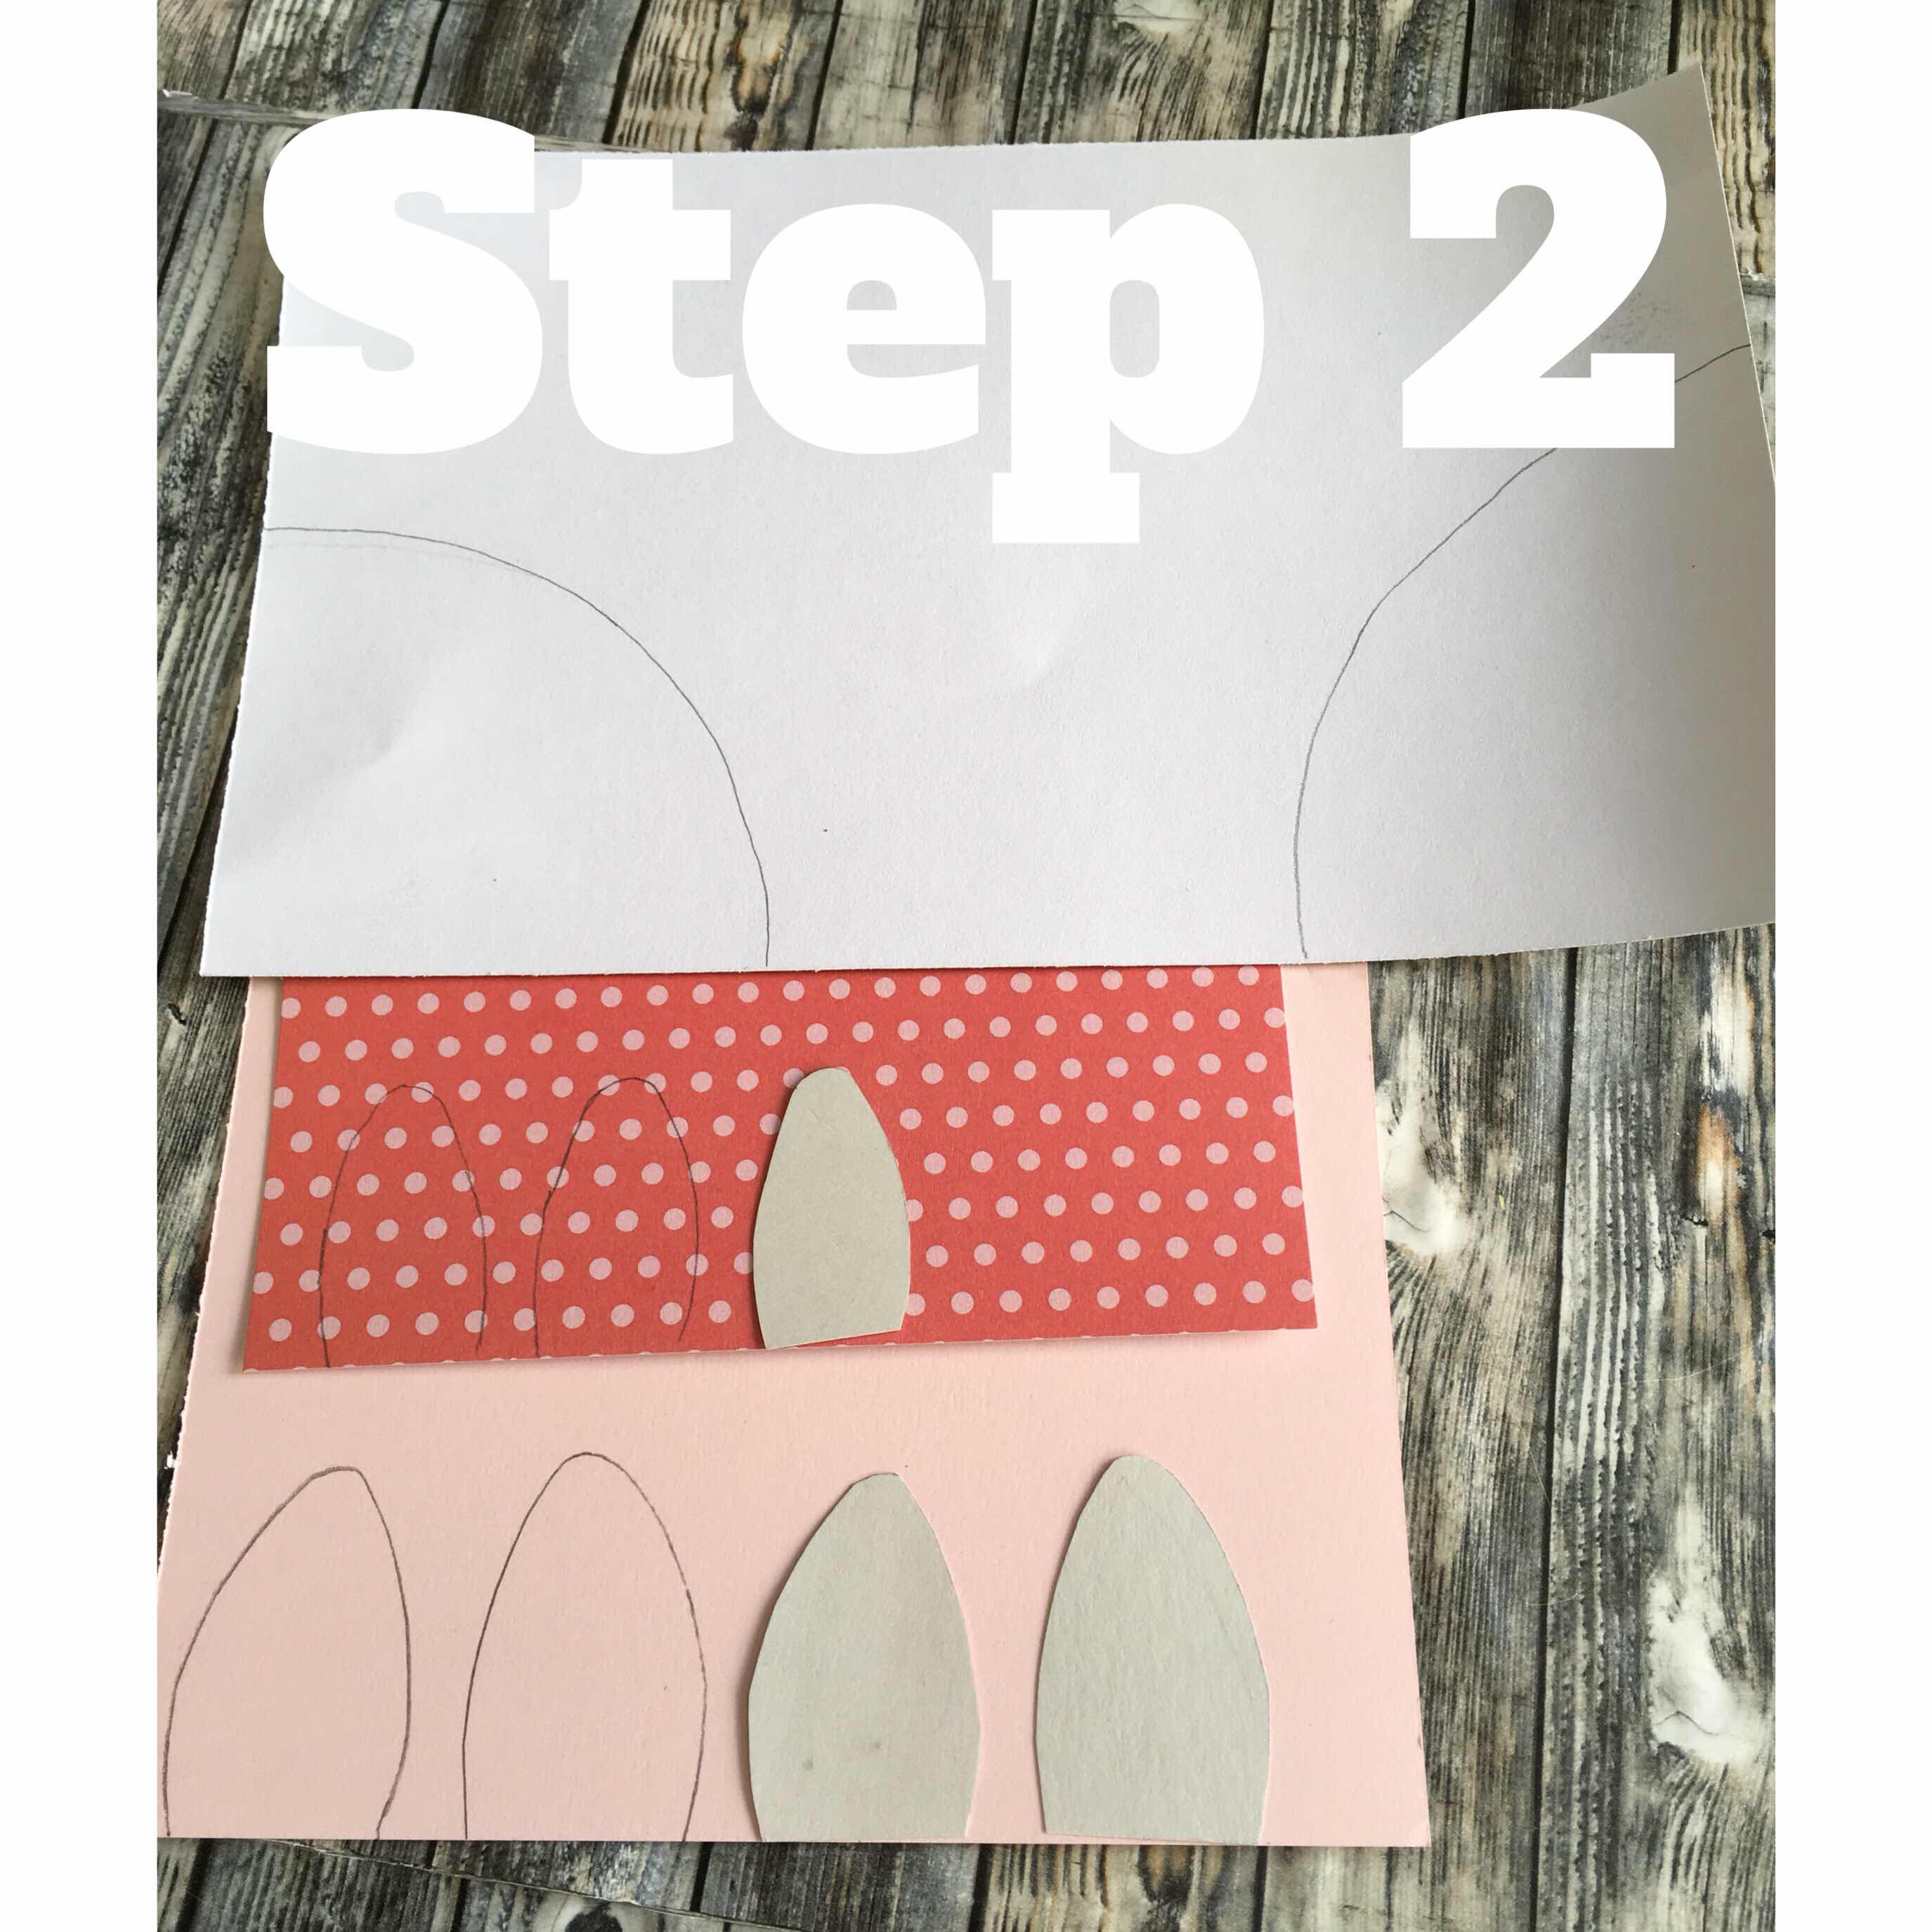
Trace and cut out the ears and horn out of the papers as seen in the photos


Once you cut out the pieces the wars should set into each other - glue them down to one another then make a small 1/2 inch or smaller crease as shown in #2 then cut a small slit in the bottom fold as shown in #3 then glue with the glue gun as shown in #4 


Then glue your cone together - notice the small hole at the top - you’ll need that to pull the gold hanger thread thru 


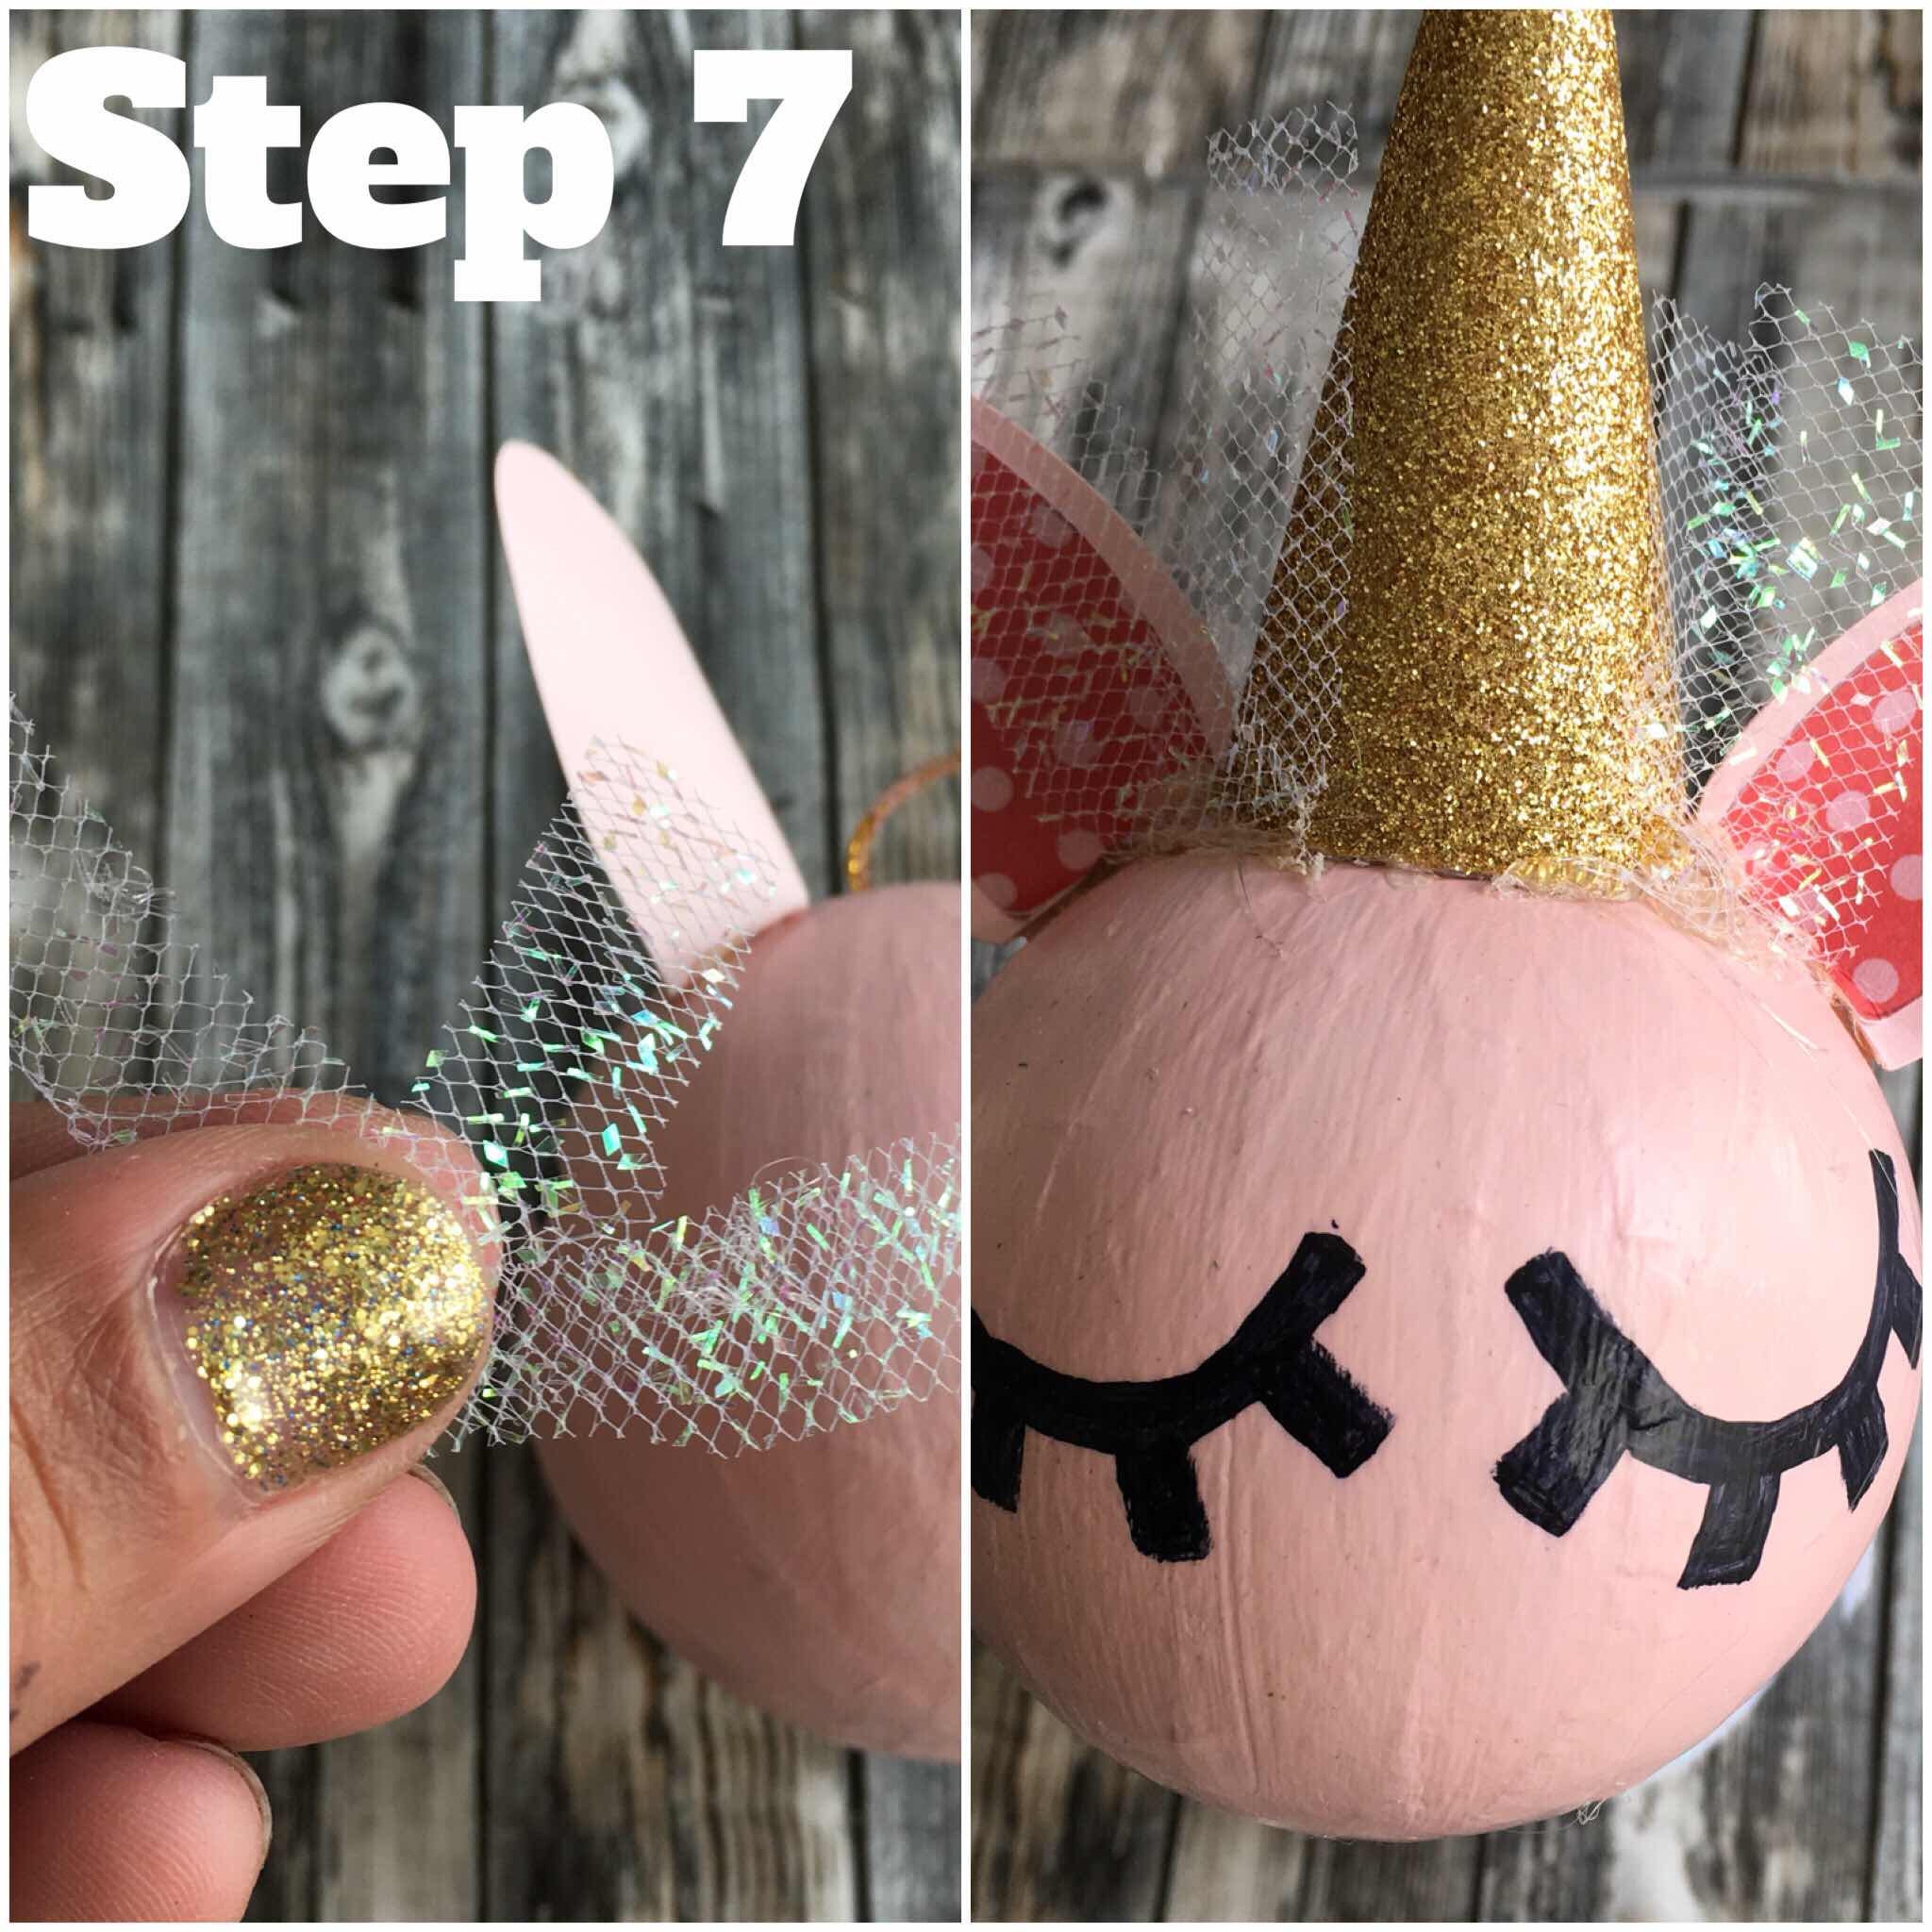
Once your done with the come add the eyelashes - these very basic but super easy - I used sharpie and as shown in the last photo I made them In different sizes and it all looks cute.


Add the horn with hot glue - let it dry - Next step is to pull the hanger thru - I used a large eye needle and put the string thru and thread the needle thru the horn and wa-la - easy!  

Next cut small pieces of tule and place them between the horn and the ears with hot glue 

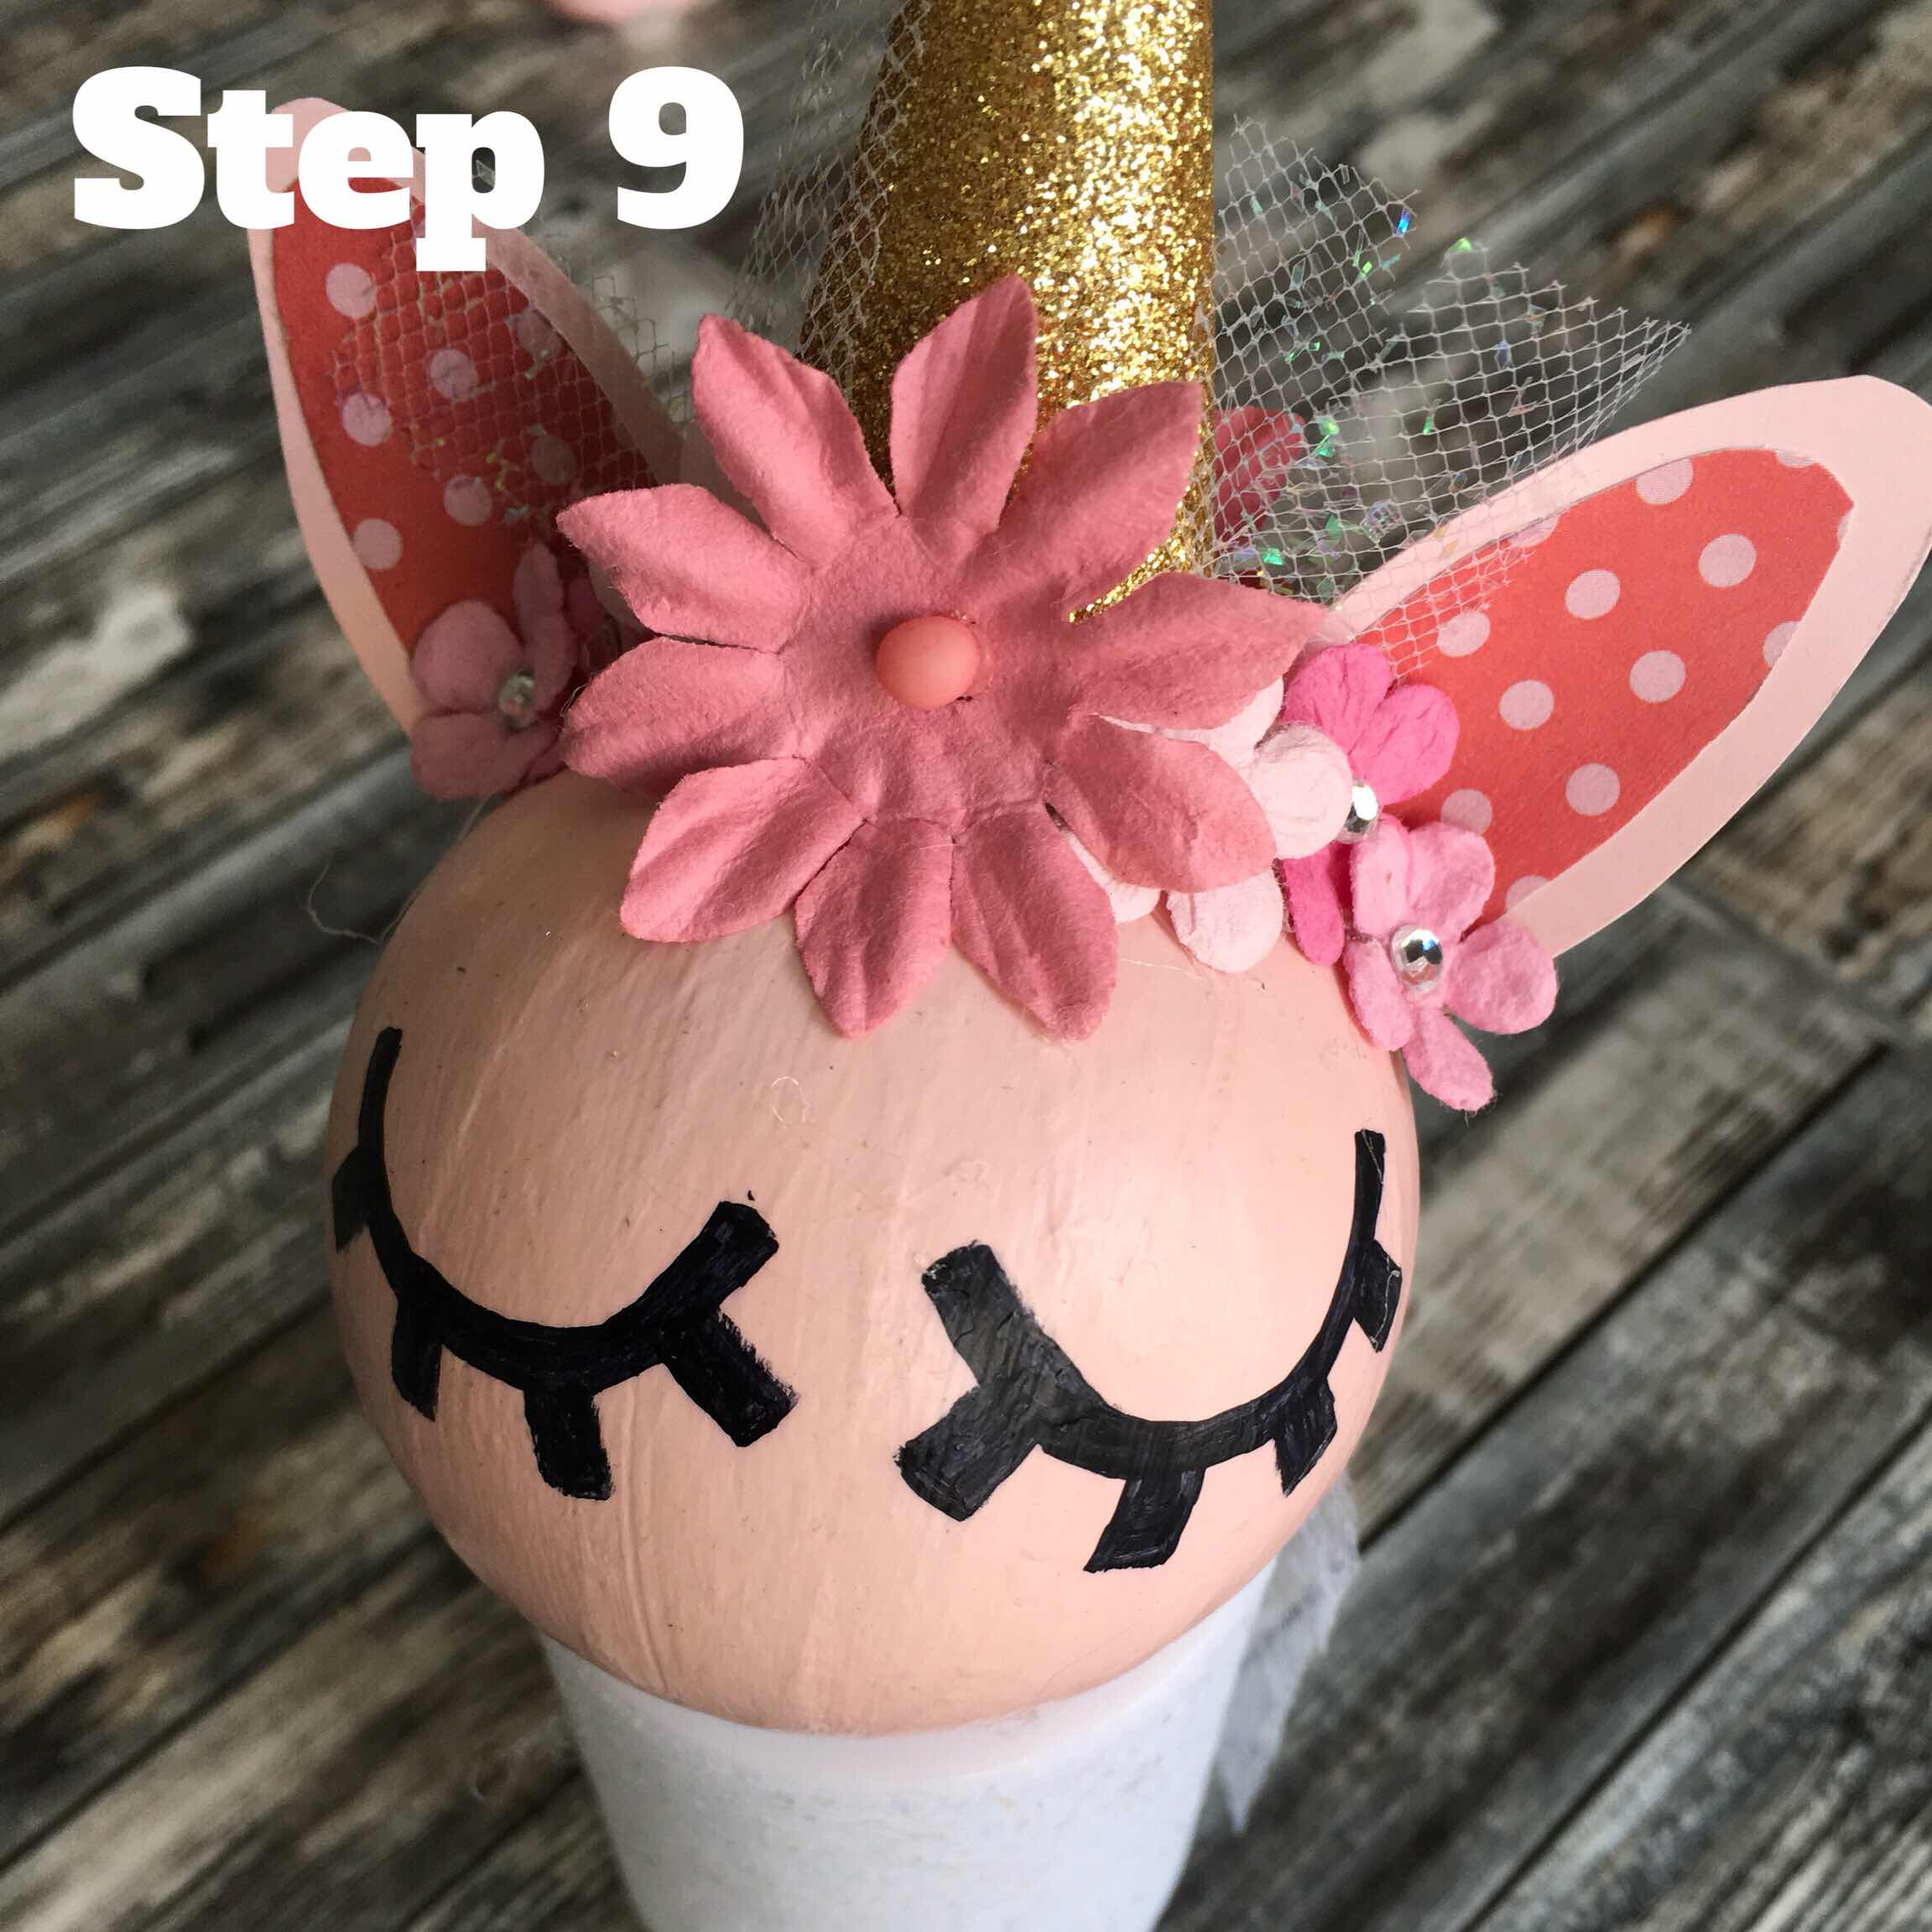
Almost done - now add the flowers - I went with one big one in the middle and smaller ones around the front - this covers up all the glue spots left after adding the horn and the ears - my flowers had small holes in the center and you can add puffy paint to the center or some small bling 


I wanted you to see the two different unicorns I made in the same colors and using the same basic materials - changed  the papers and the eyes but cute none the less. 


Thanks for stopping by - hope you like the tutorial - let me know if you make one so I can come by and check it out! 

xo 

Tina 

Tuesday, January 30, 2018

Cute Valentine Gift Idea

Ok ya’ll I wanted to share a super fun crafty girl idea with you that I am making for some sweet girls who are having me over for a Valentines Day card making party.

I am using the paper collection by Doodle Bug Designs Called 
so Punny 

First of all here are the ingredients 

You need small notebooks - there is a plethora of choices at the dollar store, you need scrapbooking paper in your choice of colors and some stickers or in my case the punny die cuts

First thing you need to do is cut out the paper to match the size of your note book and make it a little longer just an inch or two 

After you cut the paper I inked the edges and I used scalloped scissors for one edge

Then fold over the longer side of the paper directly over the glued edge of the notebook & score it with your nail or a score tool -- that folded edge will be the part you glue to the back of the notebook 

Then pick your cute puns or stickers

Add to the front of the cover and look at how spectacular and all the possibilities 

Can you stand all the cuteness 
How fun are these and what little girl or boy wouldn’t love this instead of the traditional store bought Valentine Card!!!

Happy Crafting

xoxo
T

Wednesday, February 10, 2016

The Mint-Product review

I bought a MINT which in case you hadnt heard it is a personal rubber stamp making machine. I got a great deal on it and it came with a bunch of extra inks and stamps. I decided to try and figure it out on my own without the help of my husband. Me and my husband have this kind of relationship where I buy something really cool and then he figured it out and masters using said items.

This time I did it all by myself. So this is what the MINT kit came with 


this is the machine itself small really with respects to what it can do - my iphone 6s is next to it. You plug it into your computer so that it can link up.

so first thing you need to do is open up the program on your computer. The cool thing is that you need the SIlhouette machine...the mint program can be used with just computer and the machine. Genius and money saver. YOu get a bunch of freebies to use and you can buy some other iamges with the free 25.00 they give you for buying the machine - smiley faces)
I was trying to make a stamp to match my new bussiness cards...I picked these amazing flowers and attached them to the template size of stamp I was trying to make and then added words 

you can move the words around until you get it right


once you get it how you like it - you send it to print and within seconds its done. 


and if you think wait how will i know what to print and how to reverse the image or wondering if it is going to fit DONT it does it for you. I mean really easy. like even a monkey could do it. 


then the piece come out and you attach it to the block and its there all in black face up - you see it.


That gives you the opportunity to add which ever colors you want on each word or image on your stamp.


Here is the photo of the initial inking process - it says you have to stamp it a few times to get the colors mixed and stop bleeding. As you can see by my attempts it took around 8 stamps to get the bleeding to level out.


It also gives you stickers to stamp and attach to the stamp blocks so you know which stamp is of what while the lid is on. 


Here is another style stamp I created. as you can see this was a FAIL sort of - I made the print to small and it seems to just puddle the ink in that center area. So that would be my advice - keep the letters big "enough" so you don't get puddling.

Ok so there you have it my very first product review and - next timeI think I'llmake a video or take lots more photos so that you can see each step.

Have you tried any other do-it-yourself- stamping machines? I would love to make some bigger then this next time. 

Ok happy middle of the week.

talk to you soon.
xo
T