Showing posts with label scrappy projects. Show all posts

Saturday, May 5, 2018

National Scrapbooking Day

Good Morning - it’s quite the day - two reasons to celebrate first its NATIONAL SCRAPBOOKING DAY & let’s not forget its CINCO DE MAYO - I mean can you stand it? 

In homor of the day - I want to share a fun little project I made using left over scrapbooking embellishments - one of my mottos is: use it all 

Here are the items you’ll need (by the way these stickers below are bling I bought at the dollar tree) e6000, magnets and round bling 


It’s pretty basic - add glue to the back then place on magnet and wait for it to dry! Easy peasy 


Here I share a video of all the kings I made with a paper kit and again trying not to waste the scraps 


Check back on Instagram for a fun giveaway - it’ll be happening all day today!!! 

Have a scrappy good day ya’ll! 

Friday, March 30, 2018

Easter Bags

Last year I wasn’t home Easter week and had my husband help my kids decorate Easter eggs. They sent pictures during and after the decorating process, all of which I hated missing. On Easter morning they informed that we didn’t need to do an egg hunt because they were to old for that. I asked them what about the beautiful eggs they decorated and they said they only did it for me. 

WAIT WHAT? What’s happening? Are they growing up? 
Easter 2017


This year since we will be out of town for Easter - I again mentioned that I was sad about no baskets and they told me that it’s no big deal - all we get is candy anyway so just give it to us in our hands - 

For the record - they dont only get candy- they get gift cards and money and something cute plus lots of candy 

Anyway because I’m a mom and a crafty chick I decided to make them Easter gift bags  to give to them on Easter morning and I thought maybe you could use the idea for those to old to get Easter Baskets 

Here’s what you need 
Bags (mine are from @daiso) glue stick and scraps of paper 

Cut strips and add to the front of the bags with adhesive 

Add a cute little chipboard sticker to the front 

Then use stickers to spell out the kids names 

Here are some of the things I’m putting inside (not shown is the iTunes gift card) 


And here they all are ready to pack - cute right??

By the way - to keep things real here - the idea was on point! However, there was NO room for them in any of our luggage... wah wah wah—-dang it - so I had to give it to them today before we left for the airport - they loved it - I think truthfully they want baskets but THINK they are too old...but this mama will continue to make them something - until forever... 

Hope you like the idea and if you use it send me a pic..

Happy Good Friday folks - 
Written at the airport 

xo 

T

Wednesday, August 10, 2016

It's that time again.

It's August and already I am prepping for the FALL. Which Don't know about you but FALL, Autumn and Halloween are hands down my favorite season of the year.

So to get things stated I made a few albums and some sweet cards that I  wanted to share them with you...
Here is one of the cards, nice right?


How fun and cozy is this album? I love it.


Here is another card -
looking at these colors get me all happy inside because I am counting the days
until the leaves change and the weather cools down...


Just wanted to stop in real quick and share some fun new projects I am working on.

Happy Crafting.
xo

Thursday, July 7, 2016

the 4th

I wanted to share my newest album which I made just in time for the 4th of July photos that you are currently printing (wink & smile)


I used the paper kit from Doodle Bug Designs and just fell in love with all the papers & matching embellishments.


Cute and cheery right?


I mean really aren't these pages just screaming America?


Love that there are the traditional red, white & blue and then a little bit of my favorite TURQUOISE thrown in!


Perfect color combination.


I have something new to share and hopefully I'll post it tomorrow or friday at the latest.

Come back and see me.

Happy Crafting
XO


Thursday, August 13, 2015

Playing with scraps

Recently I made up a mini scrapbook for a baby boy using some fun papers by Pebbles Inc. and I had these small scraps left over. If you are anything like me you know that its a real dilemma to throw away designer paper, then you tend to hoard those scraps and well the pile grows and grows and soon you have paper bit coming out of everywhere and sometimes even finding a home on your work space floor...hate that!

This time the paper was exceptionally cute so I decided to make up some cards with them and best part is that they are similar but not identical.'

 
Aren't the colors on this card the sweetest?

 
And just by changing the scrap pieces and the stickers you get another sweet card

 
Here they are next to each other so you can see how they resemble each other ---
I am totally loving the colors on these cards
 
I will sharing these in the following challenges:
 
Crafting with an Attitude - anything goes
Cute Card Thursday - anything goes
 
 
Happy Crafting.
xoT

Wednesday, July 8, 2015

Lovely lace

All my kids have dream catchers in their room. When they were little it was part of our nighttime ritual - after prayers I would spin it and say "DREAM CATCHER DREAM CATHCHER CATCH ALL THEIR BAD DREAMS" now I don't have to physically spin it; just include it in prayer time! 

I figured perhaps I could create a "grown up version" of the Dream Catcher🔆 

So here's my first try....


You need some lace, ribbons beads and threads in coordinating colors. I have these metal rings that I found in my Hoard- but you could use embroidery hoops 2 for one - 😊 cool! 

Step one: wrap the ring with some lace ribbon then hot glue it down (just the end pieces...then glue small dots of the lace or doily around the ring finally add your ribbon dangles with beads - use coordinating ribbon colors and threads to finish it off! 

I think this would look amazing in different colors. Make it match your room decor! 

The possibilities are endless! 

I am linking this up to the following parties: 

Monday, January 5, 2015

Getting scrappy with Tim Holtz

Trying to stay on track this year and keeping up to date on my scrapbooking. I was able to make a few pages to add to my Etsy store and then I got one done of a very important day for me.

So most people don't get my excitement but in the paper crafting field there are some super stars and well Tim Holtz and Mario are 2 of them. So I have been a fan of theirs and keep up with Tim's blog and Mario on Facebook - weird? I think more true FAN :-) Anyway, awhile back I won a giveaway Tim did and was over joyed to connect with Mario to get my prize and was in awe back then.

So if anyone who loves Tim and his products knows that he travels a lot and teaches all over and I have never been lucky enough to participate in those cool classes. So every year Tim goes to the Carson Stamp Show and everyone who follows him knows this (don't think I am a crazy stalker - wink) anyway its about an hour from my house to the Carson Show and after convincing talking my hubby into driving me down there we made it and I stood in back and watched "him" Tim that is...and he knew his stuff...I mean I expected no less but it was pretty cool...then I bought some stuff because well Mario was manning the register and sheeplishly asked for a photo - I actually think I mumbled something in pure excitement and he honored me with a photo.

Here is the scrapbook page I created of the "Best Day Ever"


Boy I was so star struck!!!
 
Here are some photos that I took but didn't make into my page...
 
 
He was the master at everything Tim! uh duh!!!!

 
That lady in the bun was in that front row spot for a good 2 hours...wouldn't budge


I mean really - that's me beaming with him in the background...its as close as I could get to him...
No really I am just a huge fan not a STALKER!!! promise...
 
 
Ok - so in honor of kicking the year of scrapbooking off to a good start here are the pages I just listed in my ETSY shop...
 
for the sweet pup in your life!

 
Christmas page

 
Love the colors for this page - also another Holiday page
 
Happy scrapbooking & star gazing
 
I'm linking this up to the following parties:


xoT
 

Monday, December 8, 2014

Christmas GIVEAWAY


I have been making a bunch of goodies for my recent craft shows and I had recently used Snow Village by pink paislee - I bought the whole kit which came with a bunch of embellishments, with way more than I could have used on the 2 albums I made. I fell in love with the gold trimmed vellum die cuts  and there were a bunch of numbers in different shapes and sizes, so, I decided to make a mini calendar/advent calendar of sorts.

 I had this small frame that I bought at Michael's it was painted blue but, because I wanted it to fit with the snow village gold trim embellies so I sprayed the frame gold. The shapes of the numbers were all different so it took a minute to situate all the pieces to fit just right. Kind of like a puzzle. 


Because I wanted you to be able to tell that It was useable as a calendar I made a magnet out of a button backed embellishment - the green MERRY over the number 5. 


All items except the Merry button was out of the Snow Village kit


I am so thrilled with the way it came out that I decided to GIVEAWAY an entire PINK PAISLEE PAPER KIT - it's got so much to play with and just in time for the holidays. 


I will be picking one person to win the entire package of goodies this Friday. All you need to do is leave a comment and if you feel like it why not follow me - a follow isn't required but would be cool. 


Ok good luck and hope you enjoyed my little creative project.

xo


Wednesday, October 29, 2014

Quick &!easy co-workers gift ideas

With the holidays fast approaching I know people are in need of some quick & not so expensive gift ideas for friends at work & perhaps your extended family members who you only see at Christmas. Well here are a few to get you started. If you are paper crafter the. You probably have lots if the materials needed for these projects in your craft room.

This is one if the oldest tricks in paper crafting & that is merely covering up something drab and making it super cool...usually done with papers & stamps. 

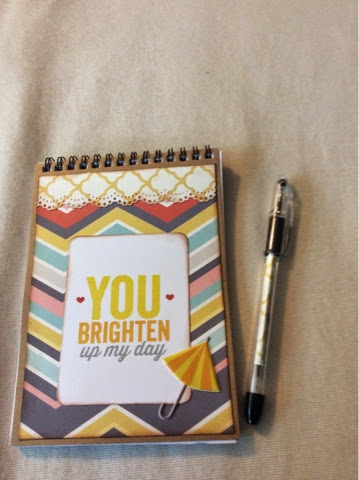
Here's how we get started: you'll need some paper scraps, some adhesive and some blank books spiral bound or

And just get to work covering them by cutting the paper to fit the front of the tablets and adding some fun little clusters of embellishments - you could make them cute, sweet or keep them simple. 


How cute would these look on your co-workers desk?


How about adding a matching pen...


The one above is just a pocket sized paper pad....purse size = fun size! 


This one is the one above the large white booklet that holds white paper the cover is hard covered just like a book.  Even added some fun little embellishments to some of the pages inside - these would be fun for a road trip so your kids could draw some pictures or play tic tac toe....


But you see what I mean by easy inexpensive gift ideas - cheap enough to make a bunch but decorated just right to make them look like something you put a lot if time into! Ain't that was the holiday season is about?

Happy crafting - I'm linking this up to parties above.

xo


Saturday, January 11, 2014

Make it - day 11

Made with you in mind-Just a quickie & just under the wire 
Hope you had a great weekend...linking up to the challenges on the right!

Happy crafting!
Tina

Thursday, June 6, 2013

Shabby chic APRON

I absolutely love to sew - but don't get me wrong I am a true amateur seamstress. I can sew straight lines and some curved ones too but I most definitely couldn't figure out a pattern to save my life. I so envy true seamstresses - people who can make their own clothes or those of their kids - PROPS to you all...with all that said - I do have a small collection of fabrics that I use for different projects and have had some sweet pink, turquoise and floral fabrics that I have been saving for just the right project, and boy did I find one...

 
I decided to make myself or my sweet LULU a new apron...and all made using left over fabric scraps. Here's the how to...
 
Cut yourself a apron shaped piece of fabric - I used some muslin
*just make sure that when you hold it up it stretches over the front of your waist not AROUND just to cover the front of your waist.

 
Next cut up your scrap fabric and use the sewing machine to make ruffles. - I didn't want to waste my time sewing up ruffles then pulling on the thread to cinch them up so I just scooted the fabric under the foot as I sewed - so they are by NO means perfect ruffles put again this adds to the SCRAPPINESS of the apron...

 
(didn't take a photo of the next step)
 
 slowly lay out the ruffles onto your apron cut out and line them up and pin them to the front -  play with pattern and colors to make sure they lay nicely. Also I suggest starting at the bottom and working your way up to the waist in case you make some measuring errors its easier to cover them TRUTH is I actually didn't sew a perfectly straight stitch at the top sort of in the middle so I need to make something to cover it up --
 
applaud === enter----- the ROLLED FABRIC ROSETTE

 
I thought it still needed something so I added petals and made a really simple for plain floral embellishment

 
and as you can see in the photograph - it is off center - because that is exactly where I sewed crooked...see there is always something that can be done to HIDE an OOPS!

 
And there you have it ladies & gents a fun and flirty apron handmade using scraps of fabrics - and in case you were wondering who LOLA is - she is my dress mannequin - I just love playing dress up with her...


Hope you enjoyed this simple tutorial and hope you have a chance to make one yourself..
 
I am linking this up to the following parties:
 
 
HAPPY CRAFTING
TINA